Best Graphics Settings and FPS For Rocket League Game

Rocket League is one of the most popular esports games played all around the world. For those wanting to experience the glory of Rocket League in spite of it not having a fancy gaming rig, this FPS guide is for you. For Rocket League, you can optimize the steam launch options, the in-game options and TASystemSettings.ini to increase your FPS and improve your gameplay and performance.
This guide covers all the currently known and allowed methods to increase FPS in Rocket League; however, if you know more ways then be sure to comment below.
Table of contents
So without further ado, let’s begin:
1) Steam Launch Options
- Go to the list of games in the Steam library.
- Right-click on Rocket League and select Properties.
- Click the Set Launch Options in the General tab.
- Type the following commands, as shown in the image below:

-high -USEALLAVAILABLECORES -nomovie -nomansky -AllowBackgroundAudio +mat_antialias 0 -malloc=system
Click on Ok, and the settings will be saved. Now the game will run much better, and you will get better FPS for Rocket League.
2) Rocket League In-Game Settings
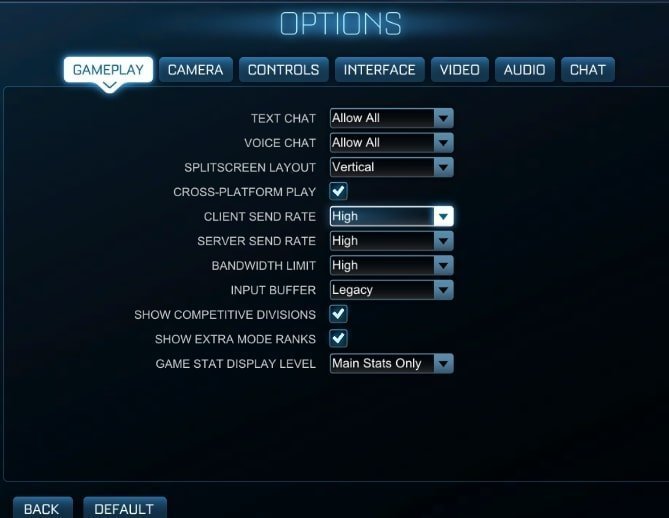
Launch Rocket League, select the Options on the game menu as shown below. Then, open the Video tab. I will guide you on how to set up each in-game setting for maximum performance.

Gameplay settings in Rocket League:
- Set client send rate: High
- Server send rate: High
- Bandwidth limit: High
Video Settings For Rocket League:

Window settings:
Resolution: use the max resolution of your monitor.
Using your maximum resolution is the best option since you get the most pleasant viewing experience, which is essential in any game. Also, low resolutions are harmful to your eyes, so avoid them if possible. Unless you are running a Pentium PC, do not lower your resolution.
Display Mode: Fullscreen.
Full Screen is the best choice hands down. Both for performance and gaming experience in Rocket League
Vertical Sync: Off.
Must be turned off for all games. It causes input lag which will make you lose easy games.
Basic Settings
Anti-Aliasing: Off.
The quality difference between “Off” and “FXAA Low” is significant, so if you can enable it. If required. If you have a decent PC, then FXAA is better. For competitive settings, turn it off.
Render Quality: High Quality.
Keep it at high quality. The reason being is that the graphics are terrible at low quality that you won’t feel like playing the game.
Render Detail: Performance / Custom.
For Competitive Game settings: Set it to Performance
Otherwise: Custom Setting is best which is auto-selected when you change any of the advanced settings
Max FPS: Max
This is the FPS cap of the game. I suggest setting it at the same value as your monitor refresh rate or slightly higher value. It gives you some competitive advantage. Frankly speaking, you should not limit the FPS. Higher is always better.
Advanced settings
If you choose performance for render detail, then do not change this. If you want to change these settings manually, then start editing the advanced settings one by one.
Texture Detail: High Performance.
I suggest keeping this setting at High Performance for a better FPS. I noticed that the high-quality option did not have much impact. Again, if your system can take it, High quality is better.
High-Quality Shaders: On.
Do not turn this off as it makes the game look really crappy. You will lose all motivation to play.
As far as everything else is concerned, disable everything except for Transparent Goalposts. This setting must be on.
This setting gives a crucial advantage because when you are inside or near a goal post, you’ll want to see where the ball is located without needing the help of the indicator.
Disabling the options will not only increase your FPS but also give you a competitive advantage while playing the game. Special effects such as Ambient Occlusion, Bloom, Light Shafts, Depth of Field, Lens Flare, Weather, and Motion Blur only cause issues with your gameplay.
- Click Apply to save the changes.
Now you can probably play the game at a very high FPS and score some serious goals!
Must read: How to Improve Your System Performance for Gaming
TASystemSettings.ini file for Rocket League
Frankly speaking, I don’t really recommend this option. But it’s an option nonetheless. I do not like it since it is risky. By risky, I mean you never know when the developers may decide to change a particular rule or policy.
Update: I reached out to the developers of the game. They said that if you did get an unfair advantage and were reported your account will be banned. Also changing the game settings incorrectly might cause the game to crash.
So I recommend doing this only as a last resort
I have explained all the graphics options and settings available in-game and via steam. If you genuinely need more FPS, but if you require more fps then you need to edit TASystemSettings.ini file of Rocket League
To find your TASystemSettings.ini file, press Win+R to open the run command and copy the following.
%USERPROFILE%\Documents\My Games\Rocket League\TAGame\Config
Backup the original config file.Open the file with notepad and delete everything inside.Now copy-paste the following code inside the file and then save the file.
This is all you need to do. You can now save the file, and you will get some fantastic graphics and performance boost.
I hope you liked the FPS Guide for Rocket League. Keep sharing and supporting the site. See you in-game
Related articles:
Sea of thieves best graphics settings


